The goal of SessionMate is to reduce the time it takes to reproduce bugs from production and make it instant, and with a single click.
To do that we record the user interactions, save it if the session is faulty, and send them to you to replay locally.
We’ve released a local only version of the product to check if it’s compatible with the projects of professional Flutter teams.
System requirements
- MacOS
- Minimum Dart 3.0.5
For each step I will add common errors that we experienced during our early adopter testing. If you experience any of these, please send me the details as a response to this email.
Get Started
Session mate has it’s own package, so let’s start by adding the session_mate package from pub.
session_mate: ^0.7.2It also comes with a CLI which can be installed from homebrew . To use this tap add the FilledStacks tap
brew tap filledstacks/tapThen install the package.
brew install sessionmateNow that you have the packages installed we can update the code use SessionMate.
Common errors
- Dependency clashes: Please take note of the pub error and the packages and send it to me in an email
Setup SessionMate code
We start by calling setup in the main function.
await setupSessionMate();A common piece of code we saw in our early adopter’s main functions is the following.
WidgetsFlutterBinding.ensureInitialized();If you’re using this in your main function you can update it to the following:
if (!kReplaySession) {
    WidgetsFlutterBinding.ensureInitialized();
}
await setupSessionMate();
Use the SessionMate widgets
In order for us to restart your app when replaying a session we need to wrap your main app with the SessionMate widget. To do this add the SessionMate package around your mainApp inside runApp
runApp(const SessionMate(child: MainApp()));And for us to record and replay user interactions we need you to add a builder to your Material app. The builder wraps the SessionMateBuilder around every view that’s navigated to in your app.
MaterialApp(
	...
	builder: (context, child) => SessionMateBuilder(
    minimumStartupTime: 6000,
    child: child!,
 ),
)
The last piece of code to add is the SessionMateRouteObserver. This you can add into your navigator observers.
MaterialApp(
 ...
 navigatorObservers: [
        SessionMateNavigatorObserver.instance,
 ],
)
if you’re using Navigator 2.0 you can use the same observer.
Saving a session
Since this is only to test compatibility of SessionMate with your app, we will be triggering the save session manuall (In production it will be triggered when an exception is thrown).
The code for this is simple, but you need to choose wisely where we put this code. The reason is, we want to replay that session, which means it has to be after you do a few things.
I usually ask that the developers put it in a place that you have to navigate to, or after login, that way you have to tap, scroll, tap, etc to get to the point where it’ll save the session. So place the code below somewhere we can save the session.
Somewhere you have to tap to trigger it would be best.
try {
	throw Exception('Save sessionmate');
} catch(e, s) {
	SessionMateUtils.saveSession(exception: e, stackTrace: s);
}
Unsupported recording functionality
-
We only support capturing http requests and no other networking protocols yet. If you use firebase, supabase, for direct connection to the backend then you can disable network recording since it won’t be helpful. You do this in the main function when you setup SessionMate.
await setupSessionMate(enableNetworkInterceptor: false); -
If you are performing a login using real credentials and you want that to replay that login during the session you should disable input masking to allow us to see what you input.
SessionMateBuilder(
	...
	enableInputMasking: false,
)
Capture a session
Now we’re ready to capture a session. To capture a session locally you’ll run your app with the following additional argument.
flutter run --dart-define=RECORD_SESSION=trueYou can record on an iOS simulator or an Android device. We support both. Now you can navigate to where you add the code above and tap to trigger it. In the logs you should see a session saved, like below:
------- Session Details 📥 -------
Id: 1698676951261
UI Events: 17
   1) Type:InteractionType.tap, View:/login-view
   2) Type:InteractionType.input, View:/login-view
   3) Type:InteractionType.tap, View:/login-view
   4) Type:InteractionType.input, View:/login-view
   5) Type:InteractionType.tap, View:/login-view
   6) Type:InteractionType.tap, View:/books-list-view
   7) Type:InteractionType.scroll, View:/book-details-view
   8) Type:InteractionType.tap, View:/book-details-view
   9) Type:InteractionType.scroll, View:/book-details-view
   10) Type:InteractionType.drag, View:/book-details-view
   11) Type:InteractionType.tap, View:/book-details-view
   12) Type:InteractionType.drag, View:/book-details-view
   13) Type:InteractionType.tap, View:/book-details-view
   14) Type:InteractionType.tap, View:/book-details-view
   15) Type:InteractionType.tap, View:/book-details-view
   16) Type:InteractionType.drag, View:/book-details-view
   17) Type:InteractionType.tap, View:/book-details-view
Response Events: 12
Views: [/startup-view, /login-view, /books-list-view, /book-details-view]
Created At: 2023-10-30T16:42:31.261
---------------------------------
Now it’s time for the magic! Replaying the session.
Unsupported functionality
- If you performed a login during your session you have to make sure you’re logged out before you replay the session. Run the app normally and logout then move on.
Replay the Session
Firstly, make sure you have an emulator running for iOS or Android. If you’re using a real device it only supports real Android devices at the moment.
Then we’ll launch the app through the sessionmate cli. Navigate to the root of your Flutter project folder and run
sessionmate drive -p . -vIf you need to pass additional commands like flavor information or anything like that you can use the additional-commands option.
sessionmate drive -p . --additional-commands="any data you want to attach after flutter run" -vWhen the app launches you should see a new UI for your app 👀

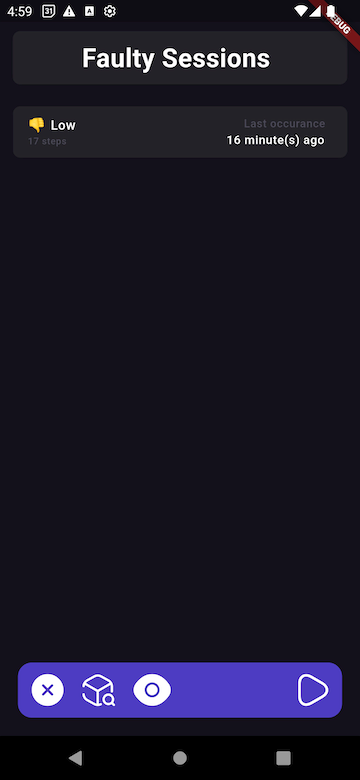
This is our replay UI. To replay your session all you do is you tap on the session you want to replay, then press the replay button (the play button in the bottom right corner). At this point we will start your app, wait for a few seconds and then start driving your app.
Things to note
- If you performed a login during your session then the app has to be logged out when you replay the session
- You can do this simply by running your app without the CLI and then logging out, then coming back to replay the session
- If the replay gets stuck please let me know, I would love to jump on a call to see what we need to do to get the product compatible with your app.
Thank you for following along, if the replay was perfect then awesome, if you ran into any issues, please respond to the original email you received and I’ll get on a call and see if we can get past your issue.
Dane


